Introduction
As your Liferay DXP platform grows, the volume of assets managed through the Documents and Media library—PDFs, images, videos, and enterprise documents—can quickly outgrow local file system storage. Amazon Simple Storage Service (Amazon S3) provides a highly scalable, external object storage backend that integrates natively with Liferay.
When configured correctly, Liferay continues to manage document metadata, folder structures, and user access controls, while offloading the physical file payload to AWS. This guide walks through the technical architecture, configuration steps, and end-to-end verification required to implement the Liferay S3 Store.
1. Understanding the Storage Architecture
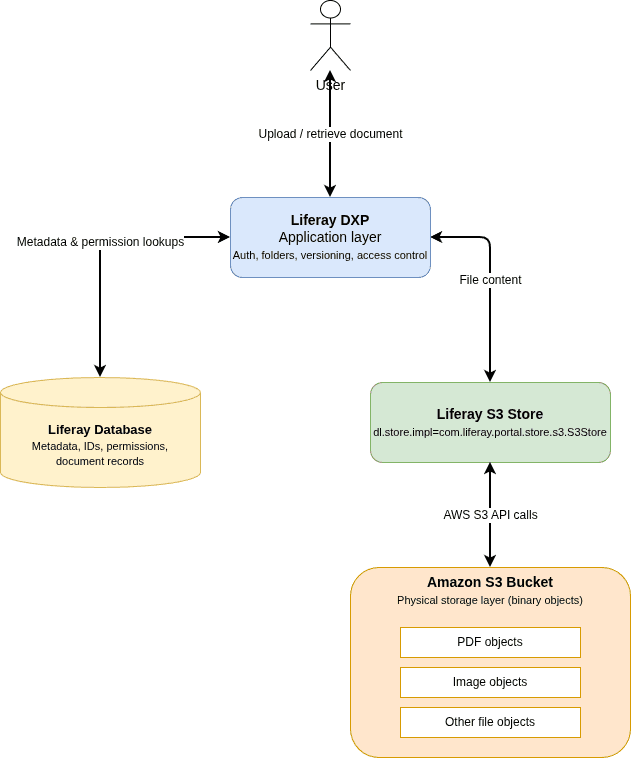
It is critical to understand the division of responsibilities between Liferay and AWS. S3 does not replicate your Liferay folder structure; it simply acts as a secure repository for binary data.
- Liferay DXP: Acts as the application layer. It manages user authentication, document metadata (stored in the Liferay database), versioning, folder hierarchies, and granular access permissions.
- Amazon S3: Acts as the physical storage layer. It stores the binary file content as objects, retrieved via API calls triggered by Liferay's S3 Store implementation.
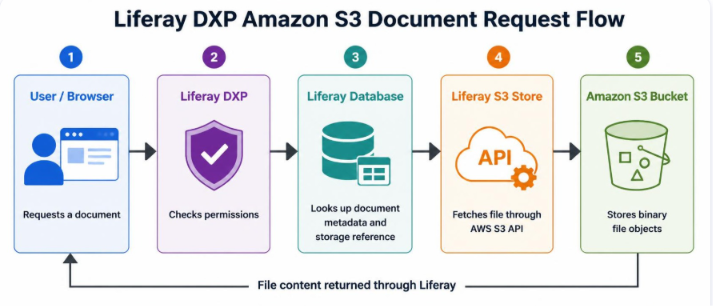
The Request Flow
When a user requests a file, Liferay verifies their permissions, looks up the document's metadata in its database to find the internal storage reference, fetches the physical object via the AWS S3 API, and serves the file back to the user's browser.
Technical Note on Object Keys: The filename a user sees in Liferay (e.g., annual-report.pdf) will rarely match the physical object key in the S3 bucket. Liferay generates its own internal identifiers/paths for S3 objects. Do not expect to browse the S3 bucket like a standard file directory.
2. AWS Environment Preparation
Before touching Liferay, you must provision and secure the underlying AWS infrastructure.
Step 1: Provision the S3 Bucket
- Log in to the AWS Management Console and navigate to Amazon S3.
- Click Create bucket.
- Provide a globally unique name (e.g.,
liferay-atsglobal-test-2026). - Select the appropriate AWS Region (e.g.,
ap-south-1for Mumbai). Note: You will need this exact region code for the Liferay configuration. - Security Check: Ensure Block all public access remains enabled. Your files should only be accessed through Liferay's permission-aware UI, never via direct public S3 URLs.
Step 2: Configure IAM Permissions
Do not use AWS root credentials. Create a dedicated Identity and Access Management (IAM) user or role specifically for Liferay. Apply the principle of least privilege by scoping the IAM policy to the specific bucket ARN and object ARN (arn:aws:s3:::your-bucket-name/*).
Liferay requires the following core actions to manage files:
s3:ListBuckets3:GetBucketLocations3:GetObjects3:PutObjects3:DeleteObject
3. Configuring Liferay DXP for Amazon S3
With the AWS infrastructure ready, configure Liferay to route document payloads to S3.
Step 1: Update Portal Properties
Instruct Liferay to use the S3 Store implementation by adding the following line to your portal-ext.properties file:
dl.store.impl=com.liferay.portal.store.s3.S3Store
Restart your Liferay DXP instance to ensure the new storage implementation class is loaded.
Step 2: Apply S3 Credentials in System Settings
Once Liferay is back online, connect it to your bucket:
- Log in as a Liferay Administrator.
- Navigate to Control Panel → Configuration → System Settings → File Storage.
- Select S3 Store.
- Populate the following fields:
- Bucket Name: Your exact S3 bucket name.
- Access Key & Secret Key: The credentials for your dedicated IAM identity. (Note: If your environment uses the AWS default credentials provider chain—such as an EC2 instance profile—you can leave these blank).
- S3 Region: The region code (e.g.,
ap-south-1). - S3 Endpoint: Leave default for standard AWS S3. (Only modify this if using an S3-compatible service like MinIO).
- Click Save.
4. End-to-End Verification of the S3 Integration
Saving the configuration does not guarantee a working integration. You must verify both the write (upload) and read (download) paths.
Phase 1: Verify the Write Path (File Upload)
- In Liferay, navigate to Site Menu → Content & Data → Documents and Media.
- Upload a simple test file (e.g.,
Testfile.txtcontaining the text "This is an S3 integration test."). - Log into the AWS Console, open your S3 bucket, and verify that a new object has been created. (Remember, the object key will be a Liferay-generated ID, not
Testfile.txt).
Phase 2: Verify the Read Path (File Download)
- Return to Liferay Documents and Media.
- Download the
Testfile.txtdocument you just uploaded. - Open the downloaded file and confirm the contents match perfectly.
Troubleshooting Common Failures
| Symptom | Where to Investigate |
| Upload rejected immediately in Liferay | Liferay user permissions, file size/type restrictions. |
| Liferay cannot communicate with S3 | Network egress rules, incorrect AWS Region string, or invalid AWS Endpoint. |
AWS returns AccessDenied | IAM policy constraints, incorrect Access/Secret keys, or restrictive Bucket Policies. |
| File uploads, but download fails | Mismatched Liferay permissions or an incomplete S3 object replication/availability issue. |
5. Amazon S3 and Liferay DXP Security Checklist
To maintain enterprise security standards, ensure your deployment adheres to the following:
- Keep the bucket private: Block public web access so files can only be downloaded by logged-in Liferay users, not via direct internet links.
- Don't use the master key: Create a dedicated, limited AWS account specifically for Liferay rather than using your main AWS root account.
- Limit Liferay's reach: Restrict permissions so Liferay can only read and write to its designated document bucket and cannot touch other AWS resources.
- Hide the passwords: Never save AWS Secret Keys in code repositories (like Git) or shared company documents where they could be accidentally leaked.
Conclusion
By offloading the binary payload to Amazon S3, your Liferay DXP architecture becomes significantly more resilient, easier to back up, and ready to handle massive document repositories without straining local infrastructure.